Let’s now proceed with our first Dev Container configuration. For the sake of simplicity, we will be developing a normal “Hello World” application in Golang.
Open your VS Code editor, and open Command Palette using Ctrl + Shift + P in (Linux or Windows) or ⇧⌘P, F1 (macOS). The following window will pop-up for you to execute any action.
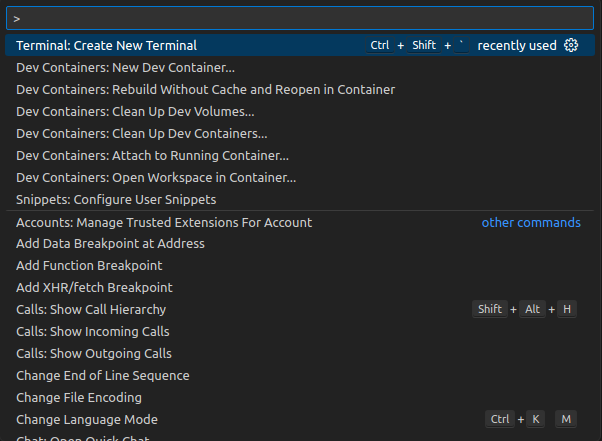
If you try searching devcontainers you will be prompted with all the available actions associated which Dev Containers extension allows.
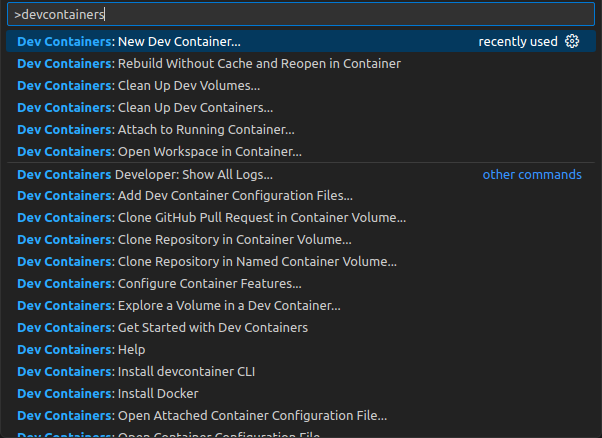
Note: Don’t use Dev Containers: New Dev Container... option as it does not support customisation and the manual installation dependencies are lost during each execution of IDE.
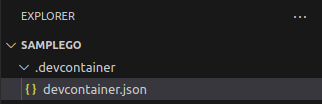
But before, proceeding towards executing any action. We need to configure Dev Containers. Dev Containers (in any IDE) uses a folder named .devcontainer at the root directory of your project or workspace. The .devcontainer contains a json file named devcontainer.json which consists of the configuration for setting up the Dev Container.
We will be constructing a simple Dev Container configuration (more complex Dev Containers are covered later in the series).
{
    "name": "DevContainer Tutorial - Golang",
    "image": "golang:1.22.0",
    "customizations": {
        "vscode": {
            "extensions": [
                "golang.go"
            ]
        }
    }
}
Explanation about the JSON key mapping inside devcontainer.json file is mentioned below:
name: Metadata name to provide this devcontainerimage: Docker image used to create this devcontainercustomizations.vscode.extensions: Install the list of extensions on the VS Code, after opening inside the editor.
Note
The
namefield insidedevcontainer.jsonfile also serves a significant purpose while naming the container on the container runtime, the initial part of the name in lowercase is used as the container-name for re-using the container on further execution.
Now let’s try to open our VS Code inside our newly created devcontainer configuration, and verify whether we are successfully able to create our Golang based devcontainer. Open your Command Palette using Ctrl + Shift + P in (Linux or Windows) or ⇧⌘P, F1 (macOS), and search for Dev Containers: Rebuild Without Cache and Reopen in Container (you can also use the option using with cache, but sometimes docker cache doesn’t build the environment properly, so to be on safer side we are building our devcontainer without cache)

After executing the Rebuild command, it will take some time to download and install all the dependencies. Once opened inside the devcontainer, you will be able to see Remote Window prompt (lower left corner of Visual Studio Code) changing to Dev Container as follows:

If you try to open a new terminal using Command Palette and search Create New Terminal and execute. It will open a new terminal. You can notice the shell terminal under use, it is different from your host machine as you are inside a container during development.

Note: Every command, you will be executing inside this terminal will be executed on the devcontainer.
To verify whether Go is installed on this devcontainer, execute go version to check the version of golang compiler installed. (Verify that both devcontainer.json and go version stated that we are using go’s 1.22.0 version)

Let’s try to create a simple Hello World application in go, create main.go file:
package main

import "fmt"

func main() {
	fmt.Println("Hello World")
}
Use your IDE terminal to run this file using go run main.go.

Question
Did you noticed the user being used in devcontainer?
If you guessed root user then, you are absolutely correct. But it poses various security risks, we will fix this in the next to next part of the series.
Note: You can also take other pre-developed docker images from Docker Hub. Also, you can checkout Golang’s official docker hub repository for other Golang versions.
Voila! We have successfully built our very first devcontainer. In the next part of this series, we will be looking at much more complex application such as a website, where a port is needed to be exposed for running smooth development.
The official specification about devcontainer.json file is located at containers.dev.
In the next part we will learn about different life cycle events while executing a devcontainer.